Author : Ryogure
Hello everyone,
Welcome to this little guide I'm making in order to answer some of the usual question I have been seeing in-game lately related to the keeping-your-party-alive-class.
Please feel free to leave any feedback and comment. Questions are also welcomed and I will try to answer them as soon as I can.
Beware! This is pretty TL;DR, but is worth it!
1.STATS
This build tries to make the best out of every single healing skills, but at the same time, will try to give you a little more sustain than usual.
This is why the build you will be using by level 50 is 45 INT 33 AGI 10 VIT base.
Focus on getting your INT to 30 first then move into adding VIT to 10, after this, switch back into adding INT then once you hit the 45 INT mark, start adding AGI.
Why adding AGI so late you may ask?
Even though AGI plays a really important role on critical heals, until later on in the game, there will no be extreme situations that depends on the amount of healing AGI can add to your criticals, Coluceo Heal will work in those cases meanwhile.
2.SKILLS - HEAVILY UPDATED (May 8 - 2013)
Acolyte phase (Lvl 1~24)
First of all, skip maxing healing spells at first since it will be high unlikely that you will party until around level 20 when you reach the Wolf Cave dungeon.
You should add 1 level into Increase Agility, then 1 point on resurrection, this will unlock Aqua Benedicta. Learn Aqua Benedicta then directly max Aspersio. This along Holy Light (Which will remain forever at lvl 1) will be your main combo during all your stay in this character. By when your character is level 6, you will have gotten all these skills.
The combo is simple: Caste Holy water (Common mistake: Holy water doesn't summon items on your inventory, is just 3 energy loads on your Aco left side):

Holy Water-Aspersio-Spell(x3 if it is heal or holy light)-Aspersio-Spell(x3)-Aspersio-Spell(x3)-Holy Water and so on.
This will be your may combo for... forever.
By lvl 7, learn Renovatio (Is a 11 seconds regen which you can caste over yourself or your party members) and for the next levels, max it. Just after you are done casting the 3 spells with Aspersio effect there will be a window of 5 seconds of no Aspersio effect, use these seconds to keep Renovatio over yourself, this way you will not use ANY kind of pot at all. Seriously. Renovatio will keep your health full all the time and Holy Water will keep your SP filled.
Now go back and max Heal, add one level to Meditatio and max Highness Heal.
By now you will have all the skills you need for your Acolyte era and you should stock up the points. You will become a Priest with 6 points on yourself.
About Blessing: Yes, you will need this maxed later, I don't consider you need it early and those stocked up points will be of a lot of help, keep further reading.
Priest phase (25-Max lvl)
Remember those points I made you stack? Well, right after you are done with your job change (For people who doesn't know is in the usual place: Prontera church at Lvl 25) get Sacrament Lvl 3, Coluseo Lvl 1, Lvl 1 Assumptio and Lvl 1 Sanctuary. This way you will have a head start when it comes to healing as a Priest, sacrificing just the blessing effect for a few more levels. These spells are extremly handy for the dungeons you will have to do in the 25~30 way (Such as Sea God). The next 2 levels focus on maxing Sacrament THEN move into maxing blessing. Done with blessing? Move into maxing Coluceo and Assumptio, one point per level on each to keep them balanced. By the point you have these two skills maxed, max Sanctuary and finally move your last points into Gloria Lvl 3, Recovery lvl 1, Suffragium Lvl 1 and Angelus Lvl 1
By when you reach Max lvl your skills will look like this:

Some questions you may have:
Why Suffragium just level 1?
We made calculations in other topics and the benefits from that skill are just not worth the points, 2% from it's level 1 is more than enough on a full healer, really.
Why maxing Sanctuary and not Angelus ?
Even though Sanctuary is pretty situational (Can't be used on some bosses since you have to move around a lot or can't stand in the same place) I highly belive the benefits are way better than those given by Angelus (Short duration effect, high cooldown) and Assumptio has a better effect on making the tank survive on raids, while not everyone will be needing blessing at the same time, you can consider sacrificing Gloria points and move them into Angelus if you want, but I prefer the permanent effect of Gloria on me. If you are skilled enough Sanctuary can even become a great savior on extreme situations. In fact, this build considers VIT as a very important stat because of Sanctuary. With 1.4k+ M. Attack, Sanctuary can heal 1.6~1.8k per heal, amazing isn't it?
It does make static bosses a breeze (Which you will face a lot while doing RHD).
In close combat bosses it does wonders, example:
Why maxing coluceo?
Coluceo is your panic button, it will save your tank or a party member extremly easily, and at max lvl, is just 3 minutes cooldown. Is wonderful, you can't afford people dying with a resurrection skill that has 45+ mins cooldown.
3.LEVELING
There's not many tricks around leveling a priest, but here are a few tips:
-Do all your quests, storyline and sidequests, just skip dungeons that you cant find a party later on.
-Use your combo properly, as I listed it on the skill section, is the fastest way you can kill, if you don't do it, you will kill even slower.
-Try to get a partner, if you are lucky enough someone will help you on early level, if not, you will be fine, but slower. Don't get frustrated over it.
-Don't get too obsessed with farming early game: that's not the purpose of your class, the higher your class is, the better healer you will be. Focus on leveling then you can do all the mats farming you want easier (Since better equip means better Holy light damage).
-Always do your Kharas that gives zeny and exp. You can skip the item drop kharas, but make sure you always do all your exp kharas, it does helps a lot.
-Use monster busters. Yes, little exp, high cost, then why? Because every single exp point cost and if you happen to have to fully solo, it will make up for the lack of partner (Since no partner means killing slower, which means slower exp). But be careful: just do buster that will complete along the completition of a normal quest. There's no point in doing busters by themselves.
-Keep your Khara titles always up to date with the map starting on lvl 30. Do at least one of the field bosses title khara of your current map, so your stats will not fall behind.
-Skip dungeons if you don't find a party. Except for Wolves Cave and Izlude Cave, dungeons will not interfere with your questing or leveling. Yes, they are nice exp boosts, but you will gain the same amount of exp in the same time if you are leveling on the field.
-Getting a Battle Manual helps, if you can afford it, go ahead. It lasts 24 hours for a 20% of extra exp. And it is playtime not constant time. 2 of them should be enough to get to 50 if you do nothing else than leveling. (Yes, getting a priest to max level by questing+busters is about 50 hours with battle manuals, if not, around 60~70). Battle manual comes from Adventurer's pack on Kafra shop for the cost of 300 points, most of the rest of the stuff is kinda useless for a priest but oh wells.
There's no many secrets besides this, since most quests can't be missed, the game will walk you through them, just do them. Maybe you will have to do some research about some monster locations for some Kharas, but shouldn't be much of a trouble.
4-WHILE IN PARTY
At low level
Keep renovatio over your tank all the time, use heals with Aspersio effect on it carefully.
A common mistake: spamming heal just makes things WORSE. If thing are getting rough and you start spamming heal like crazy all you will do is generate a lot of treat over yourself, making your character get aggroed and everyone dying in the process. Be calm, pay attention to the boss damage and who is it damaging and heal calmly.
At high level
Always make sure that you have blessing on all your party members and Sacrament and Suffragium over yourself.
Renovation goes over the tank as before. Chose wisely when to use Coluceo/assumptio: remember you will have 3 minutes without its power if you do. Tank and you are always the priority when it comes to sacrificing Coluceo. If you are gonna use Sanctuary remember to caste Aspersio aswell to maximize the effect (With 1500 M.Attack this combination can heal 1.6~2k HP!). Once you learn the patern of the boss you are farming you can start casting Assumptio over your tank to protect him a little more. Highness heal is your key for your party survival, dont make the mistake of casting it over yourself, always pay attention to your teamates position and use it wisely. If you are experienced with healing classes in other mmos you should learn all this quickly, if not, is just a matter of practice, don't worry about it and if you are newbie to healing don't worry: just let your party know.
Also: always remember your party members to also use pots, Priests aren't miracle healers, there will be situations were they MUST help the priest job by using a pot. As for you, always remember to check your SP, you usually will not run out of SP but there will be a few situation were is possible to run out of it.
5-EQUIPMENT & CARDS
Equipment:
At low level there's not much to do about it: just use watever you get while killing mobs and questing. Try to get the Payon Dungeon gear (The quest one) it will be good enough to reach lvl 50.
As for level 50 is where the fun beings:
RHD - Goblin Leader:
RHD stands for Random Hard Dungeon (Yes! Now you know what it means when you see people shouting about RHD) these dungeons are just harder versions of the dungeons you are already visited. Every boss you knew now drops a single piece (At least) of the level 50 blue gear each time you kill them, so is all about of doing all of them all the time till you complete the Heart of Black Wind item set. It will be the first set you will need complete if you want to run raids like Baphomet properly.

As for your first level 50 weapon you will want to get the Dissapearing Blessing Mace which is drop by the Goblin Leader (Which also gives the Khara for one of the nicest titles right before the Bapho one!). Each time the Goblin Leader dies, you will get a weapon for lvl 50 with 100% chance, is just a matter of luck and time to get the priest one to pop up (Took me 17 tries, for example).

The Goblin Leader location can be seen in the screenshot that follows:

Once you are done with this gear there's not much to add: move into raids such as Baphomet, get their titles and sets, and well, you will be all geared up and good to go to do watever you want in the game.
Cards:
The cards has to be a combination of AGI-INT-VIT with VIT being the highest stat on it at least.
A nice low level card is the Brown Rackuf Card.
Once at level 50 you have to move into trying to get Poisona cards (Scratch Thief Card also works but is no better than Poisona):

After this, well, enjoy fusing and farming ultra rare ones such as Fatal Mesmerizing Ramos Card.

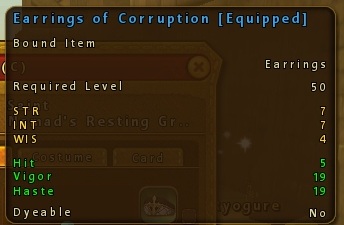
Jewelry:
The only secret that comes with Jewelry is knowing which kind to use: Get Hit/Vigor/Haste stated ones, ignore Parry/Dodge ones.
All this information should be enough to guide you through to the process of becoming a full healer priest, if you feel like something is incomplete, want further info into something or got any question feel free to ask it here.